Saturday, February 26, 2011

Pillowcase Tutorial

I got my packet from the 1 Million Pillowcase Challenge today and figured it was a great time to do some pillowcases.  Aside from that, I had Adam's (Maegan & Wade's dad) 2 kids for the day since he was so sick and his wife Anne had to work.  We made pillow cases and they turned out to be a big hit!

All the fabrics are from our own Chickadee Quilt Shop and the Robots and Ballerina fabrics are BRAND NEW and not even up on the website yet! 

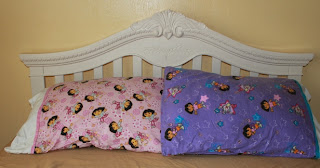
These are the actual pillowcases my twins use.  These poor pillowcases have been through so much:  thrown up on, drenched in milk and who knows what else, dragged on many of our travels, and washed a gazillion times.  They have held up so well and whenever my big kids (my teenagers Maegan and Wade) have friends over, they always comment on the girls pillowcases (we also have some for each season/holiday of the year.) When Sophie and Lillie were born we color coded them so I could tell them apart at first glance.  Lillie was assigned the color pink and Sophie was assigned the color purple.  We also assigned them certain sides of the crib so I didn't accidentally nurse the wrong baby twice (WHICH I ONLY DID ONCE!!).  Lillie is the left side and Sophie is the right side.  When they got their big girls' bed they got to choose sides and they both stuck with their original sides.  So Lillie has the pink Dora pillow and Sophie has the purple Dora pillow


Super Easy Pillowcase Tutorial

These pillowcases fit a standard size pillow and only took me about an hour to make. 

Fabric Requirements:  Choose 3 coordinating fabrics
  • Pillowcase Body:  3/4 yard
  • Cuff:  1/3 yard
  • Accent piece:  2" x WOF
The Accent piece ends up being about 3/4" wide when finished.  If you want a larger accent strip, you will want a wider cut.


Robots by Ingrid for Moda Fabrics

Ballerina by Ingrid for Moda Fabrics

  1. Iron all your fabrics - use starch.  I promise even though it is another step, it really does make a difference keeping the fabric from moving and shifting/stretching while you sew.
2.  Take your 2" x WOF Accent Piece and Iron in half


3.  Take your Cuff piece and lay out length wise.  Pin your Accent piece to your Cuff piece matching Raw edges.  You will be removing these pins a few more times so don't go too crazy on the pins just yet.  This is just to keep the Accent piece in place.


4.  Take the Body, open up lengthwise - FACE DOWN.  Line up with the raw edges and layer face down on the 2" Accent piece and Cuff.  If you are using a directional fabric, take the time to line it up so it goes in the direction you want.  Re-pin in place.


5.  Take the unpinned raw edge of the Body and fold up about 2" BELOW pinned raw edge.  You will continue the fold until the entire body is folded (this will all be about 2" below the pinned raw edges).  You will be sewing a seam along your pinned edge and you don't want folded body of the pillowcase to get caught in the seam - that is why we folded the rest of it the 2" below the pinned edges. 


This is another photo showing the Body of the pillowcase being folded 2" below the pinned raw edge.


6.  Now that the Body is folded, you will want to check your edges and make sure the selvages are straight and the grains are straight.  Your edges will not always line up perfectly as there are small variances in the widths of fabrics.  Your goal here is keep the grain straight so after it is sewn the fabric isn't twisted or skewed in one direction or the other and the whole thing lays straight.


7.  Once your edges are straight you will enclose your pillowcase body with the Cuff (which was your bottom or first layer) folding the raw edge even with the pinned raw edges.  Pin all layers in place:  Cuff, 2" Accent, 1 edge of the Pillowcase Body, Cuff.  Again, be sure the grain of the fabric is straight and not pulled to the left or right.


Another view of the Cuff pinned in place with the pillowcase body inside.


8.  Sew a 3/8" - 1/2" seam of your pillowcase "tube". 


A view of the tube sewn.


9.  Trim the selvedges of each end of your tube.  Be sure to check after you cut that you trimmed far enough to get the selvages from ALL the layers - including the pillowcase Body.


10.  After each end is trimmed, gently pull the pillowcase body out through the end - turning it inside out.


This is what it will look like when turned.


With all my picture taking my little Lillie wanted one of her (especially since Sophie got her picture taken in the dress earlier)!


11.  Turn the pillowcase over to the back side.  Iron the cuff from the seam to about 3/4 up.


A handy picture showing the iron in action.  If it weren't for quilting/sewing I'm not sure our iron would ever get any use!!

12.  Turn the Pillowcase right side up and you will need to pull the Cuff away from the Accent piece a bit and iron that straight.  This is when you will iron all the way to the end of the Cuff.


A nicely ironed cuff


13.  To do the French Seam you will fold the pillowcase WRONG sides together first.  I switched sewing feet to my 1/4" to get a smaller seam.  Sew down the side edge and then you will sew the bottom edges.


Sewing the bottom edge.


14.  Turn INSIDE OUT and iron the seam to one side.


Another view of the seam being ironed.


15. I switched feet back to my 3/8" and sewed a seam down the side and bottom again. This second seam encloses the first seam so there are no unfinished edges.


TA DA!  A super cute pillowcase.  I sent this one home with Adam's 3 year old, Landon.  He was pretty proud of his robot pillowcase especially because he helped me with pulling the pins and snipping threads.


I made this cute Owl one for Adam's 7 year old Caitlynn


And my little Sophie - who at 4 years old is already a fashionishta, picked out this one for herself.


Enjoy and please let me know if you have any questions! 


Sophie's dress in Verna by Kate Spain

I love this green fabric in Kate Spain's Verna line.


I used a pattern from McCalls pattern and it only took me about an hour to sew.  SO cute.  I decided not to hem the bottom but to just leave it serged.

I wish I could have gotten better photos - and photos of both of my girls together, but they are just 4 and if nothing else here are a few quick photos!


Friday, February 25, 2011

Which storefront is the one for me??

We have been waiting for the landlord of our Oaks Mall Plaza lease to get back to us with finalizing some of our buildout issues.  A few days ago I was talking to our agent about wanting to get open quick and that I was concerned about how long each step was going to take:  inalizing lease contract, permits, demo, more permits for the buildout, flooring, paint some electrical...the list just keeps going. Today we were told about another spot that is pretty much ready to go.  This spot is across the street from the Oaks Mall, behind Books A Million, McDonalds/Burger King, a few other stores - next to Yamato Japanese Steakhouse.  The spot is an endcap that has these gorgeous windows that wraparound the store.  The space is smaller than the one at the Plaza and it costs a bit more.  BUT, I can be in in a few weeks vs a few months.  Another positive is there is a place on the other side of this space which is another 1500 sq ft that I can add on/move into later, so I would have the entire endcap with an 2 entire walls ALL windows.

The good news is I have some time to think about it.  I'll take the next few days to pray about it and I have complete faith and trust that the Lord will inspire me with the right space.

Sunday, February 20, 2011

Lemon Pound Cake & Oreo Cheesecake Cupcakes

You would think after such a fantastic weekend I'd be over the snackies...well, this afternoon I made one of my favorite treats:  Lemon Pound Cake and I tried a new one:  Oreo Cheesecake Cupcakes by Martha Stewart

I've got the Lemon Pound Cake mastered...it completely satisfies my Starbucks & Einsteins Bagel Bros Lemon Pound Cake cravings.  I'm not a big cheesecake fan, but this was very good. 


               Lemon Pound Cake

•1 pkg Duncan Hines® Moist Deluxe® Lemon Supreme Cake Mix
•1 (3.4 oz) pkg instant lemon pudding and pie filling (I use the Sugar Free)
•4 large eggs
•1 cup water
•1/3 cup vegetable oil

Glaze:
• 1 1/3 cup powdered sugar
• 2 TBLS lemon juice
• Add water, milk, cream, half & half (your choice) to get the desired consistency

1.Preheat oven to 350°F. Grease and flour 10-inch tube pan.
2.Combine cake mix, pudding mix, eggs, water and oil in large bowl. Beat at medium speed with electric mixer for 2 minutes. Pour into pan.
3.Bake at 350°F for 50 to 60 minutes or until toothpick inserted in center comes out clean. Cool in pan 25 minutes. Invert onto heat resistant serving plate. Cool completely.


On the Oreo Cheesecake Cupcakes, these are very good!  BUT, the recipe makes a lot.  I'm putting the full recipe in below - but my suggestion is to cut it in half.  The full recipe made 36 cupcakes for me.  I also used a mini loaf pan in addition to the cupcakes.


Oreo Cheesecake Cupcakes by Martha Stewart


• 42 Oreo Cookies (30 to line cupcakes with, 12 to coarsely chop)
•4 (8 oz) pkg (or 2lbs) Cream Cheese room temp
(I use reduced fat for the Oreos & Cream Cheese)
•1 cup sugar
•1 tsp vanilla
•4 large eggs - slightly beaten
•1 cup sour cream
pinch of salt

1.Preheat oven to 275°F.  Line standard muffin pan with paper liners.  Place 1 whole cookie in bottom of each lined cup.
2.Beat Cream Cheese on high speed, scraping down as needed.  Gradually add in sugar.  Beat in vanilla.
3.Drizzle in eggs, a bit at a time.  Beat in sour cream and salt. Stir cookies in by hand.
4.Fill cups almost to top. Bake, rotating pan halfway, until filling is set.  About 22 minutes. Cool in pan.  Refrigerate 4 hours or overnight.  Remove from tins just before serving.

I plan on drizzling some chocolate over them before serving - something to make them super gorgeous.

Destin

We had a wonderful weekend in Destin at the Sandestin Resort. I had a great tennis weekend, lots and lots of food, and awesome friends!


I'm the one in the green skirt!

Saturday Jim and the twins flew up and spent the last half of the day with me.  It was so nice to have that extra bit of fun at the resort.

Wednesday, February 16, 2011

Diaper Wipe Tote

Okay...I think I got it down.  I know what I want to do with the Central Park laminated cottons.  I'm going to do the diaper and wipe case, changing pad, & a diaper bag.  Because the laminated cottons are so expensive I practiced on some scraps of Bliss by Bonnie & Camille designed for Moda Fabrics.

It took me all day as I played around with the design trying to come up with the best pattern.  This is actually # 3 that I made today!  My Sophie (one of my 4 year twins) loves to play "fabric" and she was very excited to take my discard.  She filled it up with a few toys and snacks and carried it around all day.  She even made a few requests for me to make some for her friends!  Once I figure out for who then I can monogram it.

The dimensions are 5.5" x 9.5" x 1.75"
For the handle, I took 1" brown canvas belting and sew the top with the Red Polka Dot fabric. 
Next time I'm going to change the handle a bit...check back to see the changes!

I used Velcro for the fastners - but I'd like to try magnetic closures.

I couldn't help it!  I think my Terra Cotta Soldier is going to be my new display model!

I'm hoping to have time to get the Central Park made before I head out of town for the weekend.  While I've been so excited for a tennis weekend with the girls...I'm dying to play with the laminated cottons!


Tuesday, February 15, 2011

A busy weekend

Last weekend finished the last high school wrestling weekend for us.  Wade made it to Regionals and his first match he goes down with a knee injury.  I deserver major mom points for not running out on the mat! 

He is already doing so much better but tomorrow is our follow up with the doctor.

On the storefront, I am waiting for the lease to be delivered.  Once we get this out of the way the demo can begin! 

I got my Central Park by Kate Spain laminated cottons today.  I am SOO excited.  I have spent the last little bit looking for ideas to make some samples of.  Something more than a table cloth! 

I think a diaper case, changing pad, diaper bag is a great place to start!  This will be my first tutorial for the blog!

Thursday, February 10, 2011

We got the storefront!!

OH MY HECK!  I am just speechless between I got the call this morning instead of waiting a week AND they agreed to everything I asked for!

Whoo Hoo!!!

So from here...I have to wait for the lease (probably next week since the Landlord is out of town), get that signed and give them some money.  Then they will begin the demo, clearing it back to a rectangle with 4 walls, some generic carpet, & a bathroom.  Once that is complete (30-60 days depending on permits), I then come in and customize the space with the design I want for my store.

But the very first thing I need to do...is express my gratitude.  I am so amazed at how the Lord responds to prayers and if we are patient and if we listen to the promptings and then ACT on them, the blessings will come.  I am so grateful that I listened to the prompting yesterday to switch spaces.  I am so grateful that I was able to have this opportunity. 

Oaks Mall Plaza...here we come!

Cheerfully and with patience...

We found out Monday that a national chain hair salon and submitted an application to the same retail space I had (it wasn't quite the Happy Birthday news I had been looking for).  Unfortunately, they submitted first.  When I questioned my agent, he said, "During negotionations, they did say someone else was looking at it, but I hear that all the time.  I guess it wasn't a ploy."  UGH!  The landlord offered 2 other locations located in the same plaza.  One is upstairs and a tad bit smaller, the other is downstairs and bigger.  My knee-jerk reaction was I am so going with the downstairs one.  I don't want to go upstairs and I didn't really like the space and there were a dozen other reasons.  So we began negotiations on that space. 

The next two nights I prayed over this decision again.  As "J" & I read our scriptures before bed I kept waiting for that inspiration aha moment where I would know the answer.  This morning as I was doing my usual scramble, again I thought about just not getting any answers that I felt really good about.  I didn't know what to do.  After a great morning playing tennis - it always seems to clear my mind - as I was driving home it hit me.  The upstairs location.  As I thought about it and what it had to offer, that feel good moment hit.  The feeling that I didn't have even as we were in negotiations for the other space.  I called "J" and said - HONEY!  I know this is crazy and we've already worked so hard on this other space, but I want to take the upstairs place.  As usual, my loving husband just listens to my antics, hears my reasons why, and without question says, I'll call the agent.  I had an appointment in 2 hours and he was leaving to go out of town for the next 3 days, so for us to see it - a lot had to happen considering the listing agent lives 6 hours away.  30 minutes later - our agent called, had gotten a key, and we were on our way to see the space. 

This is where things aren't so great. The space is in terrible shape and will need to be gutted and rebuilt out.  Even with all the added work, it still felt good and right.  So we put in our offer for this space and the waiting game begins again.  This afternoon I get an update call stating the Landlord is out of town until next week.  Oh my heck!  What a test of my patience. 

Tonight as I read through a talk given by Elder L. Whitney Clayton at General Conference, he talks about Alma in the Book of Mormon and how the Lord will give us strength and support, in His own time and way (that is the tough part).  He shares a scripture in Alma:  "And now it came to pass that the burdens which were laid upon Alma and his brethren were made light; yea, the Lord did strengthen them that they could bear up their burdens with ease, and they did submit cheerfully and with patience to all the will of the Lord." 

What jumped out at me on this scripture is not only do we have to have patience, for the Lord works in his own time, but again we are promised that our burdens will be made light and we can handle them with ease.  The biggest part was how Alma submitted "cheerfully and with patience."  Patience is not so easy for me, being cheerfully patient is usually not how I will be described.  But his has given me a gentle reminder to be cheerful and patient.

It is a good thing that the rest of the week will be super busy.  Thursday I have a tennis match, the twins have gymnastics, & "W" will need to be picked up from wrestling.  Friday "W" & I will be leaving early for Jacksonville, FL where the 2 day Regionals wrestling tournament is being held.  We'll end Saturday with the Gold & Green ball.  Somewhere in their I need to prepare for Sunday - I am teaching the lesson in Relief Society.

On a fun note, Central Park by Kate Spain arrived today!  I love her fabric designs - those little animals are so dang cute!

Monday, February 7, 2011

Pins & Needles

I have been sitting on pins and needles as I wait to hear on our lease for a storefront.  We are all the way to the very last step...it is down to Yes we want to add your shop to our plaza or No, we do not want a Quilt Shop in our shopping plaza.

Ugh.  Patience is not my strongest attribute...ha...so we just keep on waiting.

Today is my birthday so I am hoping that this will be a great birthday yes!  (I even sent a message to our realtor saying, "If they are on the fence in their decision, tell them it is my birthday!".

Friday, February 4, 2011

Open House Saturday!

Just a reminder...Open House tomorrow at Natalie's home from 9am-12pm!