Showing posts with label Chickadee Shops. Show all posts

Wednesday, March 21, 2012

New Quilt Kits!

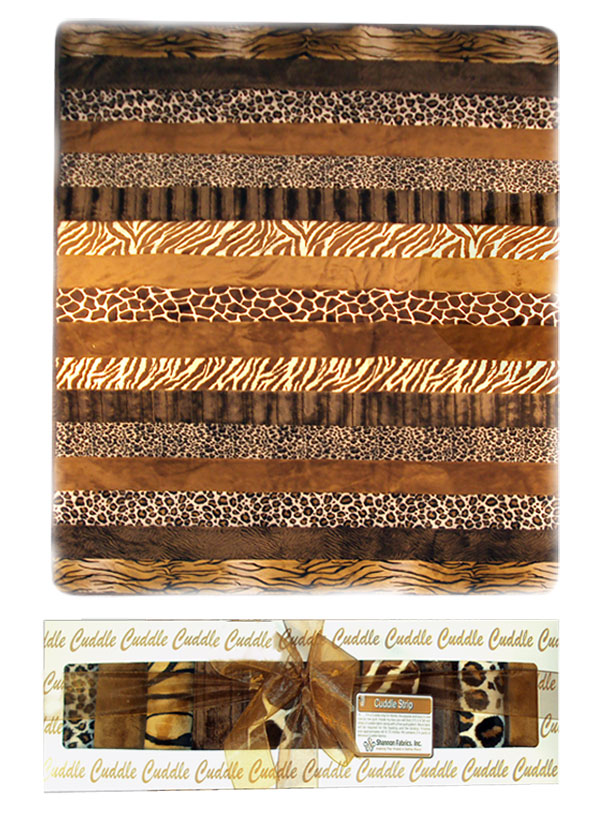
New Cuddle / Minkee Quilt Kits!


Pre Order Now - Ships 03/28/12

$65.00

Don't forget to order the backing & binding!

Animal Print Cuddle Quilt Kit, the popular and easy to sew row by row quilt. Inside the box you will find (17) approximately 5 X 58 inch strips of cuddle fabric along with a free quilt pattern. More fabric will be required for the backing and the binding. The finished size is approximately 60 X 72 inches.

Sample available of Animal Print in Store

Cuddle Quilt Kit Animal BrownCuddle Quilt KIt Black/White Zebra


Monday, March 12, 2012

April 2012 Classes are Posted!

We have 2 great classes in April! 

We have our apron class - which is a carry over from our December class schedule and then a 4 patch beginner quilt class.  This class is going to be offered in the daytime and at night!


We look forward to seeing you...


Friday, December 2, 2011

December Classes are Here!!

It has been a crazy couple of months here opening our Shop.  It has been especially difficult for me as the timing has been not so great.  The Shop opening was followed by an event in my life that has been so hard there aren't really words to explain it.  I have had to draw upon strength I didn't know I had and it has taken crazy amounts of sincere prayer and help from the Lord to be able to navigate these trials.  It has taken me 6 months to be able to get back on my feet and be able to focus on the shop. 

Thank you to all that have visited our shop for your patience and your support. 

Just when I think I'm going to make it I get hit with another trial...surgery on my right shoulder.  All those amazing hours playing tennis to cope with my stress and anxiety brought me to this!  I'm in a sling for 6 whole weeks...which means I have to do everything with my left (non dominant) hand.  Eek!!  Trust me, super tough.  6 months of therapy and and it is going to take me almost a year to get back on the courts.  This is going to be another extremely tough trial for me and my family.

BUT...getting back to the fun stuff:

Check out the December Classes...these are only a few I've got some great Holiday Gift Classes getting ready to start also.


Saturday, June 18, 2011

Storefront - BEFORE

These photos were taken 4/23/2011 a few days before demolition began.  It has been quite a process!  The space was a Hair Salon/Spa before and there ended up being quite a bit more work needed than we realized.


This is the front of the store from the Right side


View from the Left side


This is the Left Wall in the front of the store.  We shortened the wall and are going to leave it for a Display area.  This will be a rotating display...bed, kitchen, whatever goes best with the theme featured that month.


Right Wall in the front of the store.  We left this wall and will have another display area.  This is going to feature Baby/Kids items - probably going to be my most favorite part of the store


View standing from the front door - the view to the back.  Being that is was a Spa/Salon before - there are many little rooms throughout.  We took out all the walls opening up the store.


One of the many rooms in the middle of the store


This is in the middle of the store.  The view is looking from the Right Wall towards the Left Wall. The wall that juts out to the right of the open door is where the Classroom will be.  The door immediately on the right is the bathroom.


Another view of where the Classroom will be.  The bathroom door (on the right side of the photo) has been moved to the back and this smoothed into a full wall.


This is the far Left corner - the windows are actually the back of the store.  We are going to have the classroom in this area.  All the light coming in will be fantastic for the classroom.


This wall is directly across from where the classroom area is going to be.  Again, the windows are the back wall.


Front of the Oaks Mall Plaza.  We are going into the empty space upstairs between Tan USA and Great Southern Music - above the Nail shop.  The Elevator is just to the left of Tan USA - so we'll be just one store away from it.

I'm going by tonight to get some updated photos. I am SOOOO ready for the shop to open.  The new lines for Fall have arrived and my thread and a few display fixtures.  We have  a whole obstacle course now in the front hallway & piano room in our home!  In fact, maybe I'll include a picture or two of that!

Tuesday, March 29, 2011

March Madness...Comes to an End

Although March Madness has ended for us Florida Fans, we'll keep it going through the end of the month.  Which means just 2 more days before the sale is over!

I have Florida Football to look forward to next...Only 167 days to Kickoff!

Friday, March 18, 2011

Give Away Announced at 3:15pm EST

Just a reminder that we only have a few hours to go...Get all your comments, posts, Likes, orders in!  I'm soooo excited and this has been SO much fun.  Granted, I am easily entertained.

Saturday, February 26, 2011

Pillowcase Tutorial

I got my packet from the 1 Million Pillowcase Challenge today and figured it was a great time to do some pillowcases.  Aside from that, I had Adam's (Maegan & Wade's dad) 2 kids for the day since he was so sick and his wife Anne had to work.  We made pillow cases and they turned out to be a big hit!

All the fabrics are from our own Chickadee Quilt Shop and the Robots and Ballerina fabrics are BRAND NEW and not even up on the website yet! 

These are the actual pillowcases my twins use.  These poor pillowcases have been through so much:  thrown up on, drenched in milk and who knows what else, dragged on many of our travels, and washed a gazillion times.  They have held up so well and whenever my big kids (my teenagers Maegan and Wade) have friends over, they always comment on the girls pillowcases (we also have some for each season/holiday of the year.) When Sophie and Lillie were born we color coded them so I could tell them apart at first glance.  Lillie was assigned the color pink and Sophie was assigned the color purple.  We also assigned them certain sides of the crib so I didn't accidentally nurse the wrong baby twice (WHICH I ONLY DID ONCE!!).  Lillie is the left side and Sophie is the right side.  When they got their big girls' bed they got to choose sides and they both stuck with their original sides.  So Lillie has the pink Dora pillow and Sophie has the purple Dora pillow


Super Easy Pillowcase Tutorial

These pillowcases fit a standard size pillow and only took me about an hour to make. 

Fabric Requirements:  Choose 3 coordinating fabrics
  • Pillowcase Body:  3/4 yard
  • Cuff:  1/3 yard
  • Accent piece:  2" x WOF
The Accent piece ends up being about 3/4" wide when finished.  If you want a larger accent strip, you will want a wider cut.


Robots by Ingrid for Moda Fabrics

Ballerina by Ingrid for Moda Fabrics

  1. Iron all your fabrics - use starch.  I promise even though it is another step, it really does make a difference keeping the fabric from moving and shifting/stretching while you sew.
2.  Take your 2" x WOF Accent Piece and Iron in half


3.  Take your Cuff piece and lay out length wise.  Pin your Accent piece to your Cuff piece matching Raw edges.  You will be removing these pins a few more times so don't go too crazy on the pins just yet.  This is just to keep the Accent piece in place.


4.  Take the Body, open up lengthwise - FACE DOWN.  Line up with the raw edges and layer face down on the 2" Accent piece and Cuff.  If you are using a directional fabric, take the time to line it up so it goes in the direction you want.  Re-pin in place.


5.  Take the unpinned raw edge of the Body and fold up about 2" BELOW pinned raw edge.  You will continue the fold until the entire body is folded (this will all be about 2" below the pinned raw edges).  You will be sewing a seam along your pinned edge and you don't want folded body of the pillowcase to get caught in the seam - that is why we folded the rest of it the 2" below the pinned edges. 


This is another photo showing the Body of the pillowcase being folded 2" below the pinned raw edge.


6.  Now that the Body is folded, you will want to check your edges and make sure the selvages are straight and the grains are straight.  Your edges will not always line up perfectly as there are small variances in the widths of fabrics.  Your goal here is keep the grain straight so after it is sewn the fabric isn't twisted or skewed in one direction or the other and the whole thing lays straight.


7.  Once your edges are straight you will enclose your pillowcase body with the Cuff (which was your bottom or first layer) folding the raw edge even with the pinned raw edges.  Pin all layers in place:  Cuff, 2" Accent, 1 edge of the Pillowcase Body, Cuff.  Again, be sure the grain of the fabric is straight and not pulled to the left or right.


Another view of the Cuff pinned in place with the pillowcase body inside.


8.  Sew a 3/8" - 1/2" seam of your pillowcase "tube". 


A view of the tube sewn.


9.  Trim the selvedges of each end of your tube.  Be sure to check after you cut that you trimmed far enough to get the selvages from ALL the layers - including the pillowcase Body.


10.  After each end is trimmed, gently pull the pillowcase body out through the end - turning it inside out.


This is what it will look like when turned.


With all my picture taking my little Lillie wanted one of her (especially since Sophie got her picture taken in the dress earlier)!


11.  Turn the pillowcase over to the back side.  Iron the cuff from the seam to about 3/4 up.


A handy picture showing the iron in action.  If it weren't for quilting/sewing I'm not sure our iron would ever get any use!!

12.  Turn the Pillowcase right side up and you will need to pull the Cuff away from the Accent piece a bit and iron that straight.  This is when you will iron all the way to the end of the Cuff.


A nicely ironed cuff


13.  To do the French Seam you will fold the pillowcase WRONG sides together first.  I switched sewing feet to my 1/4" to get a smaller seam.  Sew down the side edge and then you will sew the bottom edges.


Sewing the bottom edge.


14.  Turn INSIDE OUT and iron the seam to one side.


Another view of the seam being ironed.


15. I switched feet back to my 3/8" and sewed a seam down the side and bottom again. This second seam encloses the first seam so there are no unfinished edges.


TA DA!  A super cute pillowcase.  I sent this one home with Adam's 3 year old, Landon.  He was pretty proud of his robot pillowcase especially because he helped me with pulling the pins and snipping threads.


I made this cute Owl one for Adam's 7 year old Caitlynn


And my little Sophie - who at 4 years old is already a fashionishta, picked out this one for herself.


Enjoy and please let me know if you have any questions! 


Thursday, February 10, 2011

We got the storefront!!

OH MY HECK!  I am just speechless between I got the call this morning instead of waiting a week AND they agreed to everything I asked for!

Whoo Hoo!!!

So from here...I have to wait for the lease (probably next week since the Landlord is out of town), get that signed and give them some money.  Then they will begin the demo, clearing it back to a rectangle with 4 walls, some generic carpet, & a bathroom.  Once that is complete (30-60 days depending on permits), I then come in and customize the space with the design I want for my store.

But the very first thing I need to do...is express my gratitude.  I am so amazed at how the Lord responds to prayers and if we are patient and if we listen to the promptings and then ACT on them, the blessings will come.  I am so grateful that I listened to the prompting yesterday to switch spaces.  I am so grateful that I was able to have this opportunity. 

Oaks Mall Plaza...here we come!