Showing posts with label tutorial. Show all posts

Friday, April 1, 2011

Frolic Panel Quilt

 
I love panels. They are great ways to make a quick project or gift. But every time I pull out the panel and say OK – I am going to make a project with this panel…the little bit of creativity I do have seems to escape me and I end up just looking at the panel. And I mean just looking at it – completely lost on what to do next.

I end up going through magazines, websites, and blogs to try and find out WHAT to do with the panel. And at the end of the day, I’ve spent all my sewing time looking for what to make and don’t even get a chance to make it!

In the latest 2011 Quilt Almanac, I found a Trapunto Quilt pattern that I thought would work great with a panel. I made some changes and love how it came out!


Frolic Panel Quilt
Finished Size: 47” x 57”

Fabric Requirements: I used Frolic by Sandy Gervais
• 1 Frolic Panel
• 1 ¼ yard Solid Brown
• 2/3 yard Green Leaves
• ¾ yard Stripe
• 53” x 63” piece of Batting
• 1 ½ yard Backing Piece
• 7/8 yard Pieced Backing Border
Cutting Directions: I “cut as I go”. This way I can get accurate borders and adjust for variances in my seams.
• Fussy Cut Panel to 23” x 35”
• Fussy Cut 4 Flowers to 5 ½ x 5 ½” keeping dots on the borders
• I saved the Cream Dot strips that I cut off the Panel for the Green Leaves Square Borders
• Solid Brown: 2 - 1 ½” x 35” (1st Border)
    2 - 1 ½” x 25”
• Stripe Fabric: 2 – 3” x 31” (2nd Border)
   2 – 3” x 37”
• Solid Brown: 2 - 2 ½” x 34” (3rd Border)
    2 - 2 ½” x 43”
• Green Leaves: 2 – 5 ½” x 28” (4th Border)
      2 – 5 ½” x 35”
        2 – 4 ½” x 4 ½”
• Solid Brown: 8 - 2 ½” x 5 1/2” (4th Border)
• Solid Brown: 6 - 3 ¾” x WOF (Outside Border)
• Stripe Fabric: 5 – 2 ½” x WOF (Binding)
• Pieced Backing: 42” x 52” (Backing Center)
• 6 – 5 ½” x WOF (Pieced Border)

Iron & Starch your fabrics. This will help your strips keep their shape.


1. Corner Blocks: Sew a ¾” Border to the Green Leaves 4 ½” square. I used the cream polka dot strips I had cut from the panel. Trim to 5 ½” x 5 ½”.


2. 1st Border – Solid Brown: Sew the 1 ½” x 35” Solid Brown strips to the Sides of the Panel. Press. Sew the 1 ½” x 25” Solid Brown strips to the Top and Bottom of the Panel. Press.


3. 2nd Border - Stripe: Sew the 3” x 37” Stripe Fabric to the Sides of the Panel. Press. Sew the 3” x 31” to the Top and Bottom of the Panel. Press.


4. 3rd Border – Solid Brown: Sew the 2 ½” x 43” Solid Brown to the Sides of the Panel. Press. Sew the 2 ½” x 36” strips to the Top and Bottom of the Panel. Press.


5. 4th Border – Pieced Sides: Sew a 2 ½” x 5 ½” Solid Brown piece to the Bottom of a Flower Square. Sew the 5 ½” x 35” Green Leaves piece to the bottom Brown Solid piece. Press. Repeat this same process for the other Side Strip. Keep in mind the placement of these strips – Left Side will have Flower Square at Top, Right Side will be Green Leaves Strip at Top. Sew to Sides of Panel. Press.


6. 4th Border – Pieced Top & Bottom: Sew a 2 ½” x 5 ½” Solid Brown piece to a Green Leaves Square. Sew a Flower Square to the other end of the 2 ½” x 5 ½” Solid Brown piece. Add another 2 ½” x 5 ½” Solid Brown piece to the other side of the Flower Square. Press. Sew the 5 ½” x 28” Green Leaves piece to the bottom Brown Solid piece. Press. Repeat this same process for the other Bottom Strip. Keep in mind the placement of these strips – Top will have Green Leaves square on the Left. Bottom will have the square to the Right. Sew to Top and Bottom. Press.


7. Outside Border – Solid Brown: Take the 6 – 3 ¾” x WOF strips and sew them together making 1 long strip. Measure Quilt Sides & Trim to Side Dimensions. Sew to Sides. Press. Measure Quilt Top & Bottom. Trim to Dimensions. Sew to Top and Bottom. Press.


Quilt Top Dimensions: 47” x 57”

I'll post pictures of the pieced backing soon!

8. Pieced Backing – Main Piece: Take your 1 ½ yards. Trim down to 42” x 52”. Press

9. Pieced Backing – Borders: Sew your 6 – 5 ½” x WOF strips together into 1 long strip. Trim to 4 – 5 ½” x 52” strips. Sew Strips to Sides. Press. Sew strips to Top and Bottom. Press.

Pieced Backing Dimensions: 52” x 62”

10. Layer, Quilt, & Bind using your Favorite Method.


Ta Da! A Quick and Easy Panel Quilt!


Please let me know if you have any Questions!


Saturday, February 26, 2011

Pillowcase Tutorial

I got my packet from the 1 Million Pillowcase Challenge today and figured it was a great time to do some pillowcases.  Aside from that, I had Adam's (Maegan & Wade's dad) 2 kids for the day since he was so sick and his wife Anne had to work.  We made pillow cases and they turned out to be a big hit!

All the fabrics are from our own Chickadee Quilt Shop and the Robots and Ballerina fabrics are BRAND NEW and not even up on the website yet! 

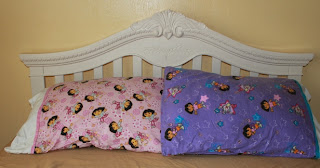
These are the actual pillowcases my twins use.  These poor pillowcases have been through so much:  thrown up on, drenched in milk and who knows what else, dragged on many of our travels, and washed a gazillion times.  They have held up so well and whenever my big kids (my teenagers Maegan and Wade) have friends over, they always comment on the girls pillowcases (we also have some for each season/holiday of the year.) When Sophie and Lillie were born we color coded them so I could tell them apart at first glance.  Lillie was assigned the color pink and Sophie was assigned the color purple.  We also assigned them certain sides of the crib so I didn't accidentally nurse the wrong baby twice (WHICH I ONLY DID ONCE!!).  Lillie is the left side and Sophie is the right side.  When they got their big girls' bed they got to choose sides and they both stuck with their original sides.  So Lillie has the pink Dora pillow and Sophie has the purple Dora pillow


Super Easy Pillowcase Tutorial

These pillowcases fit a standard size pillow and only took me about an hour to make. 

Fabric Requirements:  Choose 3 coordinating fabrics
  • Pillowcase Body:  3/4 yard
  • Cuff:  1/3 yard
  • Accent piece:  2" x WOF
The Accent piece ends up being about 3/4" wide when finished.  If you want a larger accent strip, you will want a wider cut.


Robots by Ingrid for Moda Fabrics

Ballerina by Ingrid for Moda Fabrics

  1. Iron all your fabrics - use starch.  I promise even though it is another step, it really does make a difference keeping the fabric from moving and shifting/stretching while you sew.
2.  Take your 2" x WOF Accent Piece and Iron in half


3.  Take your Cuff piece and lay out length wise.  Pin your Accent piece to your Cuff piece matching Raw edges.  You will be removing these pins a few more times so don't go too crazy on the pins just yet.  This is just to keep the Accent piece in place.


4.  Take the Body, open up lengthwise - FACE DOWN.  Line up with the raw edges and layer face down on the 2" Accent piece and Cuff.  If you are using a directional fabric, take the time to line it up so it goes in the direction you want.  Re-pin in place.


5.  Take the unpinned raw edge of the Body and fold up about 2" BELOW pinned raw edge.  You will continue the fold until the entire body is folded (this will all be about 2" below the pinned raw edges).  You will be sewing a seam along your pinned edge and you don't want folded body of the pillowcase to get caught in the seam - that is why we folded the rest of it the 2" below the pinned edges. 


This is another photo showing the Body of the pillowcase being folded 2" below the pinned raw edge.


6.  Now that the Body is folded, you will want to check your edges and make sure the selvages are straight and the grains are straight.  Your edges will not always line up perfectly as there are small variances in the widths of fabrics.  Your goal here is keep the grain straight so after it is sewn the fabric isn't twisted or skewed in one direction or the other and the whole thing lays straight.


7.  Once your edges are straight you will enclose your pillowcase body with the Cuff (which was your bottom or first layer) folding the raw edge even with the pinned raw edges.  Pin all layers in place:  Cuff, 2" Accent, 1 edge of the Pillowcase Body, Cuff.  Again, be sure the grain of the fabric is straight and not pulled to the left or right.


Another view of the Cuff pinned in place with the pillowcase body inside.


8.  Sew a 3/8" - 1/2" seam of your pillowcase "tube". 


A view of the tube sewn.


9.  Trim the selvedges of each end of your tube.  Be sure to check after you cut that you trimmed far enough to get the selvages from ALL the layers - including the pillowcase Body.


10.  After each end is trimmed, gently pull the pillowcase body out through the end - turning it inside out.


This is what it will look like when turned.


With all my picture taking my little Lillie wanted one of her (especially since Sophie got her picture taken in the dress earlier)!


11.  Turn the pillowcase over to the back side.  Iron the cuff from the seam to about 3/4 up.


A handy picture showing the iron in action.  If it weren't for quilting/sewing I'm not sure our iron would ever get any use!!

12.  Turn the Pillowcase right side up and you will need to pull the Cuff away from the Accent piece a bit and iron that straight.  This is when you will iron all the way to the end of the Cuff.


A nicely ironed cuff


13.  To do the French Seam you will fold the pillowcase WRONG sides together first.  I switched sewing feet to my 1/4" to get a smaller seam.  Sew down the side edge and then you will sew the bottom edges.


Sewing the bottom edge.


14.  Turn INSIDE OUT and iron the seam to one side.


Another view of the seam being ironed.


15. I switched feet back to my 3/8" and sewed a seam down the side and bottom again. This second seam encloses the first seam so there are no unfinished edges.


TA DA!  A super cute pillowcase.  I sent this one home with Adam's 3 year old, Landon.  He was pretty proud of his robot pillowcase especially because he helped me with pulling the pins and snipping threads.


I made this cute Owl one for Adam's 7 year old Caitlynn


And my little Sophie - who at 4 years old is already a fashionishta, picked out this one for herself.


Enjoy and please let me know if you have any questions! 


Tuesday, February 15, 2011

A busy weekend

Last weekend finished the last high school wrestling weekend for us.  Wade made it to Regionals and his first match he goes down with a knee injury.  I deserver major mom points for not running out on the mat! 

He is already doing so much better but tomorrow is our follow up with the doctor.

On the storefront, I am waiting for the lease to be delivered.  Once we get this out of the way the demo can begin! 

I got my Central Park by Kate Spain laminated cottons today.  I am SOO excited.  I have spent the last little bit looking for ideas to make some samples of.  Something more than a table cloth! 

I think a diaper case, changing pad, diaper bag is a great place to start!  This will be my first tutorial for the blog!