Although March Madness has ended for us Florida Fans, we'll keep it going through the end of the month. Which means just 2 more days before the sale is over!
I have Florida Football to look forward to next...Only 167 days to Kickoff!

Tuesday, March 29, 2011
Friday, March 25, 2011
March Madness Continued...
Alright...for those of you following with my March Madness - The Gators are moving on to the Elite 8 which means the Chickadee Shops discounts are moving up with them!
Discount is now up to 42% ...
Use Promo Code ELITE8
for an extra 32% off all prices at Chickadee Shops
Go Gators!
Discount is now up to 42% ...
Use Promo Code ELITE8
for an extra 32% off all prices at Chickadee Shops
Go Gators!
Thursday, March 24, 2011
March Madness
I am a huge sports fan and tonight is going to be a dilemma...Do I cheer for Florida or BYU?
 VS
VS 
Definately time for some March Madness
SO...here is a fun twist to the sale. If Florida wins tonight, and makes it to the Elite 8 - starting tomorrow, I'll take another 2% off.
VS I am a UF graduate and have been going to Gator games since I was a little girl. In my family ALL everyone has attending either FL or BYU...and my oldest, Maegan, has BYU at the top of her list for school next year.
Definately time for some March Madness
Save an Extra 30% off all prices - INCLUDING Sale Items!
Use Promo Code MARCH40 during checkout
Sale ends March 31st, 2011
I suppose it really isn't that much of a dilemma for me because I am a Florida gal through and through.
SO...here is a fun twist to the sale. If Florida wins tonight, and makes it to the Elite 8 - starting tomorrow, I'll take another 2% off.
If Florida makes it to the Final 4, I'll take another 2% off.
GO GATORS!!
Friday, March 18, 2011
Give Away Announced at 3:15pm EST
Just a reminder that we only have a few hours to go...Get all your comments, posts, Likes, orders in! I'm soooo excited and this has been SO much fun. Granted, I am easily entertained.
Tuesday, March 15, 2011
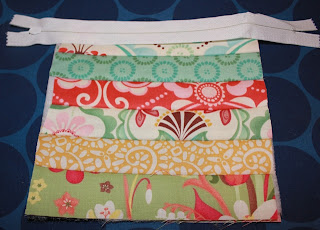
Little Zipper YoYo Purse
I was so excited to get another project up for everyone but it was an uphill battle Saturday. What should have only taken an hour or two took several! I don't know if it was just being distracted with stopping to take photos or all the interruptions by my twins. So if anyone has had days like this while sewing, I will share some of my mishaps - even though they are pretty darn embarassing as we move through the Tutorial below!
Once finished, my little Sophie was quick to claim this purse for her. I told her I was going to use it in the store and she was just shocked that I would "give away" her purse. So, it looks like I'll be making another!
I found a pattern similar to this one in the Winter 2010 Quilts and More magazine. What is so fantastic about this pattern is it was made with 1 Fat Quarter and scraps that I had leftover from Sophie's dress and a tiered skirt.

Sophie Loves her purse! My twins: Lillie & Sophie
I just love these girls!
Little Zipper YoYo Purse
Fabrics: Fandango by Kate Spain
Verna by Kate Spain
Finished size: 6" x 7"
Fabric Requirements: 14- 1 1/2" x 6.5 strips of assorted prints (or 1/4 yard total assorted prints)
Fat Quarter for Bias & Strap
9" x 22" (Fat 8th) piece for Lining
1/4 yard Fusible Fleece
9" Zipper
Cutting: Instructions:
Assorted Prints: 14- 1 1/2" x 6.5 strips
Fat Quarter: 2 1/2" Bias Strips to total 75" for binding and strap
Fat 8th: 2- 7" x 9" rectangles for lining
Fusible Fleece: 2- 6 3/4" x 8 3/4" rectangles

1. Fuse Fleece to back of Lining pieces

2. Take 1 of the 1 1/2" x 6 1/2" strips and center right side up on bottom edge of the FLEECE side of bag lining. Place your next strip RIGHT SIDES TOGETHER and sew. (MISHAP #1: I sewed my strips to the Fabric side on my first attemp and didn't notice until I had finished ALL 8 Strips!)

3. Iron or Finger Press open. Repeat step 2 for all 8 strips. When you get to the last strip, sew the raw edge to the lining piece using your 1/4" seam. Trim to 6 1/2" x 8 1/2".

4. For Front of Bag, Repeat step 2 & 3 for 6 strips. Trim to 6 1/2" x 6 1/2" square.

5. Center Zipper on FACEDOWN on RIGHT side of Bag Front. Use a zipper foot (or your choice of foot) and sew zipper to bag front.

6. Press bag front away from zipper. Topstitch 1/4" from fold.

7. Repeat step 5 & 6 to add bag back to remaining edge of zipper.

8. Add any Embellishments at this time. I added YoYos with Button Centers. (MISHAP #2: my machine would not sew buttons on for anything! It ended up sewing my bag to the faceplate on my machine and I had to remove my faceplate to cut out all the threads..ugh!)


I gave up on Machine sewn buttons and hand sewed the buttons on.
9. I used a bowl from my kitchen to make the half circle template from. Fold bag so bottom edges are even. Trace around template.

10. Move zipper tab to center of bag. Sew along sides and your marked half circle tracing. THEN zipper excess and trim to 1/4" outside the seam line. (MISHAP #3: I forgot to move my stitch from zig zag to seam and the needle breaks off and the tip gets me right in the neck! I chose to spare yall' the photos of my 17 year old digging the needle tip out.)

11. Using the diagonals from your bias cuts, make a 75" long binding strip. Iron in half lengthwise, wrong sides together.

12. Find center of strap and align - then pin to bottom center of bag. Pin in place and sew in place.

13. Fold binding to back of bag pinning in place. Take your strap and fold into thirds enclosing the raw edges. Press in place and stitch along edge of binding from one end to the other.

14. Determine length of bag strap. Tie straps.
TADA! You now have a Zipper YoYo Purse! Super fun and super easy with SOOO many options for embellishments.
Monday, March 14, 2011
Graham Cracker & Oreo Marshmallows
We are a big fan of Melting Pot, a fondue restaurant. My favorite is their cheese fondue but I suppose they are most popular for their chocolate fondue One of my favorites is the marshmallows - which are rolled in Graham Cracker crumbs and Oreo crumbs. On our last visit I asked how to make them and they were happy to share them with me! These are so fast and easy to make and my 4 year old twins had no problems helping me out!


Oreo & Graham Cracker Marshmallows
Melting Pot version
Ingredients: Marshmallows, water, crumbs
1. If you want to make your own crumbs: Put graham crackers in a bag. I found the easiest way to crush them and get a nice fine crumb is to use a rolling pin to crush with. I just roll and roll moving the bag around until you get a nice fine crumb. For the Oreo crumbs, you need only the oreo part. I'm sure you will have no shortage of people to eat the middles out of your oreos! I scraped the middle out used just the cookie part. Then I followed the same procedure of placing them in a bag and using a rolling pin to crush.
2. Take your Marshmallows and roll in water.
3. Put your wet marshmallows in the crumb mixture and shake.
Tada! You now have gorgeous covered marshmallows that are super yummy. These are perfect for fondue, covering in chocolate, smores, or to just eat!
Sudoku Quilt Kit Give Away!

We are going to be Giving Away a Central Park by Kate Spain OR Perennials by Kansas Troubles Sudoku Quilt Kit!
HOW TO ENTER: Every Comment on our Blog or Facebook will count as an entry. For every order you place on http://www.chickadeeshops.com/ you will get 1 entry for every $10 spent.
ENDS: Friday March 18th at 3pm EST. I want to get this shipped to the winner Friday!
ENDS: Friday March 18th at 3pm EST. I want to get this shipped to the winner Friday!
HOW WILL I KNOW IF I WIN? We will post the winner on our Blog, Facebook, and on http://www.chickadeeshops.com/ Site. Notification will be sent to the winner via Email for the shipping address and choice of Central Park or Perennials.

Saturday, March 12, 2011
Zipper Tutorial
Sewing Zippers CAN be easy! Here is a quick and easy tutorial for adding zippers to your projects.


Zipper Tutorial
Shown in the Zipper YoYo Bag Tutorial
Some Tips before you get started:
- Start with a new needle
- 2.5-3mm is a great stitch length
- Buy a Zipper that is longer than needed
- Try some differnt feet: zipper, zigzag, etc.
- Finish the seam with a nice topstitch or zigzag on the outside
1. Lay out front side of your project, right side up. Use your selected foot (I used a zipper foot) and 1/4" seam and sew to bag front.

2. Finger press away from zipper. Topstitch 1/4" from fold.

3. We are going to repeat the same process to add the zipper to the back. Finger press away and Topstitch 1/4" from fold.

4. I had some fabric excess fabric so I trimmed the back raw edges of the to be even with the zipper for a clean look.

5. When it is time to sew up the edges, move your zipper stop to center while you sew. Be careful to keep the open zipper edge still together. Once sides are sewn & zipper stops reinforced, trim ends.

Tada! Zippers made easy!
True Bias Tutorial
Bias runs diagonally in a woven fabric. The "true bias" runs exactly 45 degree angle to the grain lines and it has the most stretch in a woven fabric.
When to cut on the Bias?
Typically the straight grain cut is fine for your bias, but for a project that is curved or shaped the true bias is what you want to use. This is also great for curved applique pieces.
Another reason to cut a true bias is to create a visual effect such as using plaids or stripes. It will create a "barber pole" effect and is pretty neat.
Cutting on the Bias
1. Start with a fabric square or rectangle.

2. Using a ruler and rotary cutter cut one edge at a 45 degree angle.
Measure out how wide you want your strips. These are traditionally 2 1/2" wide. Continue cutting strips until you have the length needed.

TIP: To prevent the fabric from distorting spray with starch and iron prior to cutting.
3. Sew your strips together matching diagonal edges. Iron in half, wrong sides together.

See how easily the bias strip curves on this bag.

Tada! Now you are ready for those curvy projects!
Friday, March 4, 2011
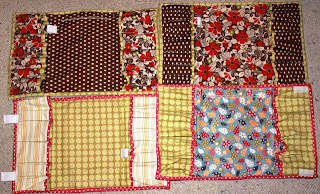
Crayon Keepers
Last year during our General Conference for church, I wanted to have a Crayon Keeper for my girls. I had been looking around and couldn't find a good pattern for what I wanted. In August we were headed to BYU for Education Week so I made one for my girls for the airplane ride. Everyone loved it and I got many requests!
I was having a hard time finding exactly what I was looking for, so I ended up designing one that accomplished everything I wanted!
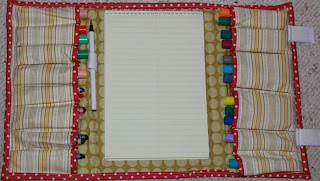
I went with a tri-fold rectangle design instead of the traditional crayon roll. I needed something that would fold up flat so it would fit easily into our carry on bags and not take up a lot of room. It measures 7" x 10" - specific to fit a 6" x 9" notepad. I wanted the notepad to be big enough for the girls to draw on. I put in 2 rows of holders - one for markers, one for crayons. The pip squeak markers fit in perfectly. I also added a pen holder. It is a tri-fold design so it encloses the crayons/markers to keep them from falling out - which is why I didn't want the bag with the crayons on the outside. I just knew we would lose those as the bag would get knocked around...I do have TWO 4 year olds! I used velcro to keep it closed and I knew velcro would be great for the girls to be able to open and close it easily.
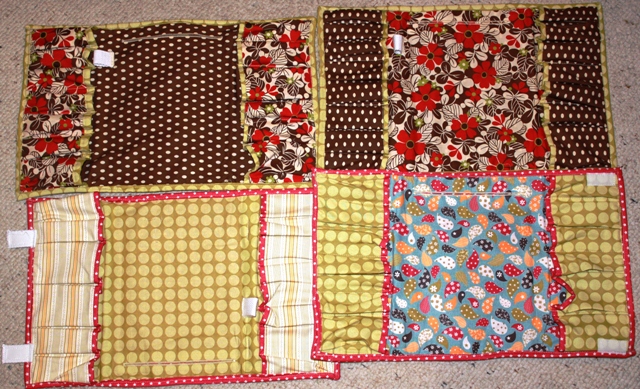
Here are some photos of the 4 that were ordered. They are each personalized for each child. It is fun on the personalizing because you can embellish it for each child or family's personality. On my little Sophie's keeper, who is very girly, I added grosgrain ribbon bows which added just enough frilly to it without making it a nuisance.
The brown florals are made out of Freebird by Momo for Moda Fabrics and the blue ones are made from Make Life by Sweetwater for Moda Fabrics.


I was having a hard time finding exactly what I was looking for, so I ended up designing one that accomplished everything I wanted!
I went with a tri-fold rectangle design instead of the traditional crayon roll. I needed something that would fold up flat so it would fit easily into our carry on bags and not take up a lot of room. It measures 7" x 10" - specific to fit a 6" x 9" notepad. I wanted the notepad to be big enough for the girls to draw on. I put in 2 rows of holders - one for markers, one for crayons. The pip squeak markers fit in perfectly. I also added a pen holder. It is a tri-fold design so it encloses the crayons/markers to keep them from falling out - which is why I didn't want the bag with the crayons on the outside. I just knew we would lose those as the bag would get knocked around...I do have TWO 4 year olds! I used velcro to keep it closed and I knew velcro would be great for the girls to be able to open and close it easily.
Here are some photos of the 4 that were ordered. They are each personalized for each child. It is fun on the personalizing because you can embellish it for each child or family's personality. On my little Sophie's keeper, who is very girly, I added grosgrain ribbon bows which added just enough frilly to it without making it a nuisance.
The brown florals are made out of Freebird by Momo for Moda Fabrics and the blue ones are made from Make Life by Sweetwater for Moda Fabrics.

Closed the measurements are 7" x 10"
Open the measurements are 10" x 18" (so a Fat Quarter would work just fine!)

The notebook measures 6" x 9" and it fits quite a few markers and crayons. The notebook actually slides in so it is anchored in and won't fall out.

This one I was experimenting with different closure options - I made some tabs out of 1" cotton belting with velco on them. I think I like the regular hidden velcro best shown in the other Crayon Keepers.
Again, I am slow to get pictures up...but I'll get the step by step pictures up soon!
Crayon Keeper Tutorial
Design by Natalie Hill
4 Coordinating Fat Quarters for Outside, Lining, Pockets, Binding
Decor Bond 11" x 18"
Decor Bond scrap 2" x 6.5"
Velcro
Outside Fabric: Cut 1 - 11" x 18"
Lining Fabric: Cut 1 - 11" x 18"
Pockets Fabric: Cut 2 - 7"-8" x 18"
Binding: 2" x 22"
1" Belting
1. Iron on Decor Bond to wrong side of Outside Fabric. Add your monogramming. Set Aside.
2. Find Center of Lining Fabric. Depending on the size of your notepad center your notepad onto the Lining. I used a 6" x 9" pad so I came down about 1.5" from top edge and there is about 5.5" on either side of notepad.
3. Iron on a 2" x 6" strip of Decor Bond on wrong side, centered behind where you button hole will be stitched. This is to reinforce the opening to hold the weight of the notepad.
4. Do a button hole stitch 6.25" long - I wanted the notepad to fit in snug so I went just barely longer than my notepad.
5. Use 1" belting (or make your own out of your fabric scraps) to make a pen holder. Fold the belting in 1/2 and sew the raw edges to one side of the notepad. It is easier to do this if you put your notepad in and then figure out exactly where you want your pen holder.
6. Fold your Pocket Fabric in 1/2 lengthwise and iron. The width will be determined by how wide you cut it...8" will give you 4" when folded in half. Keep in mind when you get to this what you want in your pockets. You don't want your pockets so deep that the markers/crayons get lost inside them. You now have 2 - 4" x 18" pieces.
7. Take an 2" binding strip and fold in half. Bind the folded edge of each pocket.
8. Pin your lining and outside fabrics - wrong sides - together. Put your notebook in and fold - leaving some room for markers & crayons. Mark where you want your velcro placed. Separate the lining and outside fabrics and sew in your velcro to the Outside and Lining fabrics. This way your seam lines don't show and you won't sew any of your pockets closed. (I learned this the hard way!) This is a good time to add any embellishments to your Outside: YoYos, Rick Rack, Ribbon, etc.
9. Take the raw edges of the pocket and line up with the 11" raw edge of the Lining piece. Sew each 4" edge to the Lining.
10. Now to make the indiviual pockets. I just centered the pocket fabric on the lining and did straight stitches to raw edge. I did this with each piece until I had as many pockets as I wanted. Then I folded the raw edges so they made pleats along the bottom and sewed it in place along that 11" raw edge. Do this for both pockets.
11. Match your Outside and Lining wrong sides together again. Pin in place. Baste around raw edges to keep it from shifting.
12. Bind your raw edges using your favorite binding method.
TaDa! Your Crayon Keeper is ready for use!
Thanks for reading and let me know if you have any questions!
Diaper Tote & Changing Pad
I got the Diaper Tote and Changing Pad finished using the Laminated Cottons of Central Park by Kate Spain. This was much easier to work with than I expected. I used a walking foot and that kept it from slipping. What I found to be most useful was I used this 1/8" double stick binding/seam tape that was perfect for holding my binding in place until I sewed it.
I followed the same directions that I used when I made the sample Tote in Bliss by Bonnie & Camille.
I have a Diaper Bag to add to this set and then I'm sending it to Australia for my little sister's baby girl that is due in July!


I followed the same directions that I used when I made the sample Tote in Bliss by Bonnie & Camille.
I have a Diaper Bag to add to this set and then I'm sending it to Australia for my little sister's baby girl that is due in July!
Diaper Tote open - Changing Pad in background

Diaper Pad folded in Tote. There is room for wipes and 2 diapers.

On the handle I added a velcro closure so the tote and can be attached to anything.
Back of Tote has a pocket
Here is a Tutorial. I'll post pictures of each step soon!
Diaper Tote and Changing Pad Tutorial
Diaper Wipe Tote dimensions: 5.5" x 9.5" x 1.75"
Diaper Pad: 17" x 19"
Fabric: Central Park Laminated Cottons by Kate Spain for Moda Fabrics
Diaper Wipe Tote Fabric Requirements:
2 Coordinating Fat Quarters for Body and Lining
1/3 yard: Body Fabric for Side & Back Pocket
1/8 yard: Lining Fabric
Velcro for flap closure
Velcro for handle (optional)
1" Belting for Handle
CUTTING:
Fat Quarter for Body:
Front: 6" x 10"
Back: 6" x 15"
Fat Quarter for Lining:
Front: 6" x 10"
Back: 6" x 15"
Body Fabric:
Side: 2 1/4" x WOF
Back Pocket: 6" x 13.5"
Lining Fabric:
Handle: 2" x your desired handle length
Binding: 2 1/2" x WOF
Pocket Binding: 2 1/2" x 6"
1. Sew Lining Side to Lining Front - clip corners. Repeat with Body Fabric
2. Line up Back starting with the bottom since it is longer than the front. Pin in place. Sew Lining Back piece to front/side piece.
3. Fold Back Pocket in half. Bind pocket top edge.
4. Sew Sides of Back Pocket to Right side of Body Back, lining bottom raw edges.
5. Sew Body Back to Front/Side piece. You now have a Lining bag and an Outside bag.
6. This next part is your choice: You can put right sides of Lining and Outside together and then turn. You can tack the bottom corners of the Lining and Outside together and then turn. I tacked the bottome corners and then turned it so the lining is correctly placed into the Outside Body Piece.
7. Fold 2" of Handle Fabric in half and iron. Open up and fold side to middle fold (it ends up only being a 1/4 fold) - iron. Do it again for the other side.
8. Handle Fabric is now 1" wide. Sew to the 1" canvas belting.
9. Sew handle to sides of Bag
10. I chose to make a neat little curve for fold over part of my bag. The Bliss bag I did a Left to Right sloping curve. This bag I did a half mood curve.
11. Figure out where you want your velcro fastener and sew to folding flap and to the body front.
12. Bind raw edges of Bag - taking time to be careful as you turn the corners.
13. Turn Handles up and sew in place.
Changing Pad Tutorial
Dimensions: 17" x 19"
Fabric Requirements: Coordinating Fat Quarters
Binding: 2 1/2" x WOF
Quilt Batting: 17" x 19"
Cutting:
Cut each Fat Quarter to 17" x 19"
1. Layer Fat Quarter, Quilt Batting, Fat Quarter
2. Baste edges to hold in place
3. Bind Edges
These turned out pretty darn neat. The biggest hurdle I had was the binding. Trying to bind the curves was really hard. I think I liked the way I did the Bliss Bag where it sloped Left to Right better than doing the half moon curve. I also like the way it looks better and I think that slope will hide some binding imperfections. With the half moon curve it is very easy to have your curves not match up just right and it is obvious since it is supposed to be symetrical.
I'll get some pictures posted of each step!
Thanks for looking and let me know if you have any questions!
Subscribe to:
Posts (Atom)