Once finished, my little Sophie was quick to claim this purse for her. I told her I was going to use it in the store and she was just shocked that I would "give away" her purse. So, it looks like I'll be making another!
I found a pattern similar to this one in the Winter 2010 Quilts and More magazine. What is so fantastic about this pattern is it was made with 1 Fat Quarter and scraps that I had leftover from Sophie's dress and a tiered skirt.


Sophie Loves her purse! My twins: Lillie & Sophie
I just love these girls!
Little Zipper YoYo Purse
Fabrics: Fandango by Kate Spain
Verna by Kate Spain
Finished size: 6" x 7"
Fabric Requirements: 14- 1 1/2" x 6.5 strips of assorted prints (or 1/4 yard total assorted prints)
Fat Quarter for Bias & Strap
9" x 22" (Fat 8th) piece for Lining
1/4 yard Fusible Fleece
9" Zipper
Cutting: Instructions:
Assorted Prints: 14- 1 1/2" x 6.5 strips
Fat Quarter: 2 1/2" Bias Strips to total 75" for binding and strap
Fat 8th: 2- 7" x 9" rectangles for lining
Fusible Fleece: 2- 6 3/4" x 8 3/4" rectangles
1. Fuse Fleece to back of Lining pieces
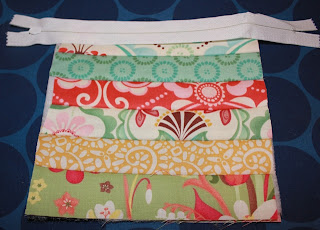
2. Take 1 of the 1 1/2" x 6 1/2" strips and center right side up on bottom edge of the FLEECE side of bag lining. Place your next strip RIGHT SIDES TOGETHER and sew. (MISHAP #1: I sewed my strips to the Fabric side on my first attemp and didn't notice until I had finished ALL 8 Strips!)
3. Iron or Finger Press open. Repeat step 2 for all 8 strips. When you get to the last strip, sew the raw edge to the lining piece using your 1/4" seam. Trim to 6 1/2" x 8 1/2".
4. For Front of Bag, Repeat step 2 & 3 for 6 strips. Trim to 6 1/2" x 6 1/2" square.
5. Center Zipper on FACEDOWN on RIGHT side of Bag Front. Use a zipper foot (or your choice of foot) and sew zipper to bag front.
6. Press bag front away from zipper. Topstitch 1/4" from fold.
7. Repeat step 5 & 6 to add bag back to remaining edge of zipper.
8. Add any Embellishments at this time. I added YoYos with Button Centers. (MISHAP #2: my machine would not sew buttons on for anything! It ended up sewing my bag to the faceplate on my machine and I had to remove my faceplate to cut out all the threads..ugh!)
I gave up on Machine sewn buttons and hand sewed the buttons on.
9. I used a bowl from my kitchen to make the half circle template from. Fold bag so bottom edges are even. Trace around template.
10. Move zipper tab to center of bag. Sew along sides and your marked half circle tracing. THEN zipper excess and trim to 1/4" outside the seam line. (MISHAP #3: I forgot to move my stitch from zig zag to seam and the needle breaks off and the tip gets me right in the neck! I chose to spare yall' the photos of my 17 year old digging the needle tip out.)
11. Using the diagonals from your bias cuts, make a 75" long binding strip. Iron in half lengthwise, wrong sides together.
12. Find center of strap and align - then pin to bottom center of bag. Pin in place and sew in place.
13. Fold binding to back of bag pinning in place. Take your strap and fold into thirds enclosing the raw edges. Press in place and stitch along edge of binding from one end to the other.
14. Determine length of bag strap. Tie straps.

TADA! You now have a Zipper YoYo Purse! Super fun and super easy with SOOO many options for embellishments.


Wow! Where have you been all my life? Everything I've read (having just started reading your blog) is something I'd love to do. The purse above is perfect for an older friend who uses such for all kinds of things but has a very hard time finding them to buy.
ReplyDeleteThe oreo and graham marshmallow recipe is so creative and i'm ALWAYS looking for new unique and cute recipes to add to my collection (I figure I'm going to live til at least 200 to have time to make them all).
The tutorial will be very useful and helpful.
What can I say, I LOVE your site.