
I was having a hard time finding exactly what I was looking for, so I ended up designing one that accomplished everything I wanted!
I went with a tri-fold rectangle design instead of the traditional crayon roll. I needed something that would fold up flat so it would fit easily into our carry on bags and not take up a lot of room. It measures 7" x 10" - specific to fit a 6" x 9" notepad. I wanted the notepad to be big enough for the girls to draw on. I put in 2 rows of holders - one for markers, one for crayons. The pip squeak markers fit in perfectly. I also added a pen holder. It is a tri-fold design so it encloses the crayons/markers to keep them from falling out - which is why I didn't want the bag with the crayons on the outside. I just knew we would lose those as the bag would get knocked around...I do have TWO 4 year olds! I used velcro to keep it closed and I knew velcro would be great for the girls to be able to open and close it easily.
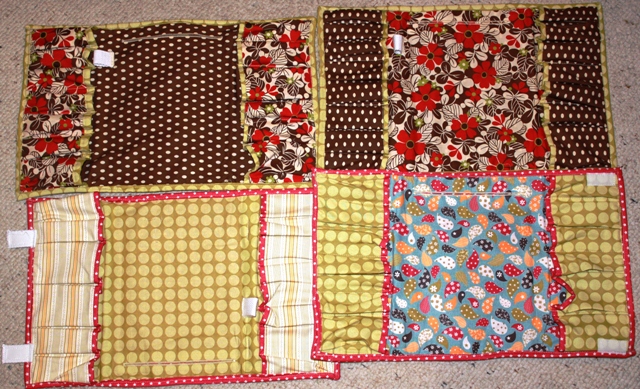
Here are some photos of the 4 that were ordered. They are each personalized for each child. It is fun on the personalizing because you can embellish it for each child or family's personality. On my little Sophie's keeper, who is very girly, I added grosgrain ribbon bows which added just enough frilly to it without making it a nuisance.
The brown florals are made out of Freebird by Momo for Moda Fabrics and the blue ones are made from Make Life by Sweetwater for Moda Fabrics.

Closed the measurements are 7" x 10"
Open the measurements are 10" x 18" (so a Fat Quarter would work just fine!)

The notebook measures 6" x 9" and it fits quite a few markers and crayons. The notebook actually slides in so it is anchored in and won't fall out.

This one I was experimenting with different closure options - I made some tabs out of 1" cotton belting with velco on them. I think I like the regular hidden velcro best shown in the other Crayon Keepers.
Again, I am slow to get pictures up...but I'll get the step by step pictures up soon!
Crayon Keeper Tutorial
Design by Natalie Hill
4 Coordinating Fat Quarters for Outside, Lining, Pockets, Binding
Decor Bond 11" x 18"
Decor Bond scrap 2" x 6.5"
Velcro
Outside Fabric: Cut 1 - 11" x 18"
Lining Fabric: Cut 1 - 11" x 18"
Pockets Fabric: Cut 2 - 7"-8" x 18"
Binding: 2" x 22"
1" Belting
1. Iron on Decor Bond to wrong side of Outside Fabric. Add your monogramming. Set Aside.
2. Find Center of Lining Fabric. Depending on the size of your notepad center your notepad onto the Lining. I used a 6" x 9" pad so I came down about 1.5" from top edge and there is about 5.5" on either side of notepad.
3. Iron on a 2" x 6" strip of Decor Bond on wrong side, centered behind where you button hole will be stitched. This is to reinforce the opening to hold the weight of the notepad.
4. Do a button hole stitch 6.25" long - I wanted the notepad to fit in snug so I went just barely longer than my notepad.
5. Use 1" belting (or make your own out of your fabric scraps) to make a pen holder. Fold the belting in 1/2 and sew the raw edges to one side of the notepad. It is easier to do this if you put your notepad in and then figure out exactly where you want your pen holder.
6. Fold your Pocket Fabric in 1/2 lengthwise and iron. The width will be determined by how wide you cut it...8" will give you 4" when folded in half. Keep in mind when you get to this what you want in your pockets. You don't want your pockets so deep that the markers/crayons get lost inside them. You now have 2 - 4" x 18" pieces.
7. Take an 2" binding strip and fold in half. Bind the folded edge of each pocket.
8. Pin your lining and outside fabrics - wrong sides - together. Put your notebook in and fold - leaving some room for markers & crayons. Mark where you want your velcro placed. Separate the lining and outside fabrics and sew in your velcro to the Outside and Lining fabrics. This way your seam lines don't show and you won't sew any of your pockets closed. (I learned this the hard way!) This is a good time to add any embellishments to your Outside: YoYos, Rick Rack, Ribbon, etc.
9. Take the raw edges of the pocket and line up with the 11" raw edge of the Lining piece. Sew each 4" edge to the Lining.
10. Now to make the indiviual pockets. I just centered the pocket fabric on the lining and did straight stitches to raw edge. I did this with each piece until I had as many pockets as I wanted. Then I folded the raw edges so they made pleats along the bottom and sewed it in place along that 11" raw edge. Do this for both pockets.
11. Match your Outside and Lining wrong sides together again. Pin in place. Baste around raw edges to keep it from shifting.
12. Bind your raw edges using your favorite binding method.
TaDa! Your Crayon Keeper is ready for use!
Thanks for reading and let me know if you have any questions!
No comments:
Post a Comment